Después de muchas horas, pruebas y de casi no poder acabarlo, os presento mi primer controlador MIDI basado en Arduino UNO.
After many hours of testing and almost unable to finish it, I present my first MIDI controller based on Arduino UNO.
¿ Como funciona ¿
How does it work?
- Seleccionamos un grupo de potenciometros, 0, 1, 2, 3... hay 8 grupos, es decir 8 x 4 potenciometros = 32 potenciometros virtuales.
- We selected a group of potentiometers, 0, 1, 2, 3 ... There are 8 groups, i.e 8 x 4 = 32 virtual potentiometers .
- Elegimos entre el P0, P1, P2, P3, ( los cuatro potenciometros reales ).
- Chose between P0, P1, P2, P3, ( the four real potentiometers ).
- Una vez elegidos, asignamos mediante el pulsador ( manteniendo pulsado ) y el encoder mecánico, uno de los Control Change que aparece en el listado de Control Change que a continuación aparece en el display .
- Once selected, assigned by the button (holding down) and mechanical encoder, choose one of the Control Change that appears in the display.
- Habiendo asignado el número de canal al potenciometro, es decir que el canal MIDI no esté en midi = 0. El controlador empezará a enviar mensajes por la salida de MIDI OUT.
- Having allocated channel number potentiometer, ie the MIDI channel is not in midi = 0. The controller will start sending out messages for MIDI OUT.
Podéis observar que el funcionamiento es muy sencillo. Este uno de los objetivos mas importantes que quería conseguir, pues como músico electrónico y usuario de hardware me he encontrado con máquinas que no hacen lo que se supone tienen que hacer, y este era el caso de mi controlador Evolution UC-33
You can see that the operation is very simple. This one of the most important goals I wanted to achieve, because as electronic musician and hardware user I found machines that do not do what they are supposed to do, and this was the case of my Evolution UC-33 controller.
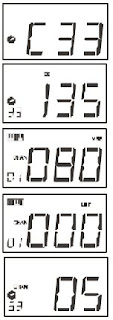
No es que sea una mala máquina, pero es que ( yo creo ) que no es práctico tener 24 potenciometros, 8 deslizadores además de pulsadores y que la única información que obtienes de su bonito display azul sea tan criptico como esto:
It's not a bad machine, but is that (I believe) it is not practical to have 24 potentiometers, 8 sliders and buttons as well as the only information you get from her pretty blue display is as cryptic as this:

Obligándote de esta manera a introducir un elemento más en tu "set-up"... la cinta de pintor para poder saber que has asignado en cada potenciometros.
Thus forcing you to introduce another element in your "set-up" ... masking tape to know that you assigned in each potentiometers.
.
.
.
¿Os imagináis hacer una actuación y que perdáis la cinta para anotar adonde asignasteis cada función?
Can you imagine doing a show and you miss the tape to record where each function was asigned ?
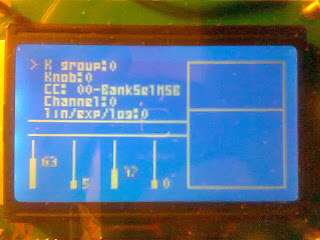
Descripción de la información en el menú:
Description information in the menu:
 K group: Grupo de potenciometros
K group: Group potentiometers
Knob: Potenciometro
Knob: Potentiometer
CC: Control Change
CC: Control Change
Channel: Canal MIDI que estamos asignando.
Channel: MIDI channel that we are assigning
Lin/exp/log: Respuesta de los potenciometros lineal / exponencial y logarítmica ( no implementado ).
Lin / exp / log: linear potentiometers Response / exponential and logarithmic (not implemented).
Los niveles indican la posición absoluta del potenciometro, esto va muy bien para ver a simple vista doce tienes el potenciometro.
The levels indicate the absolute position of the potentiometer, this is nice to see at a glance twelve have the potentiometer.
El controlador se basa completamente en un Arduino UNO, utilizando todas las entradas menos el pin número 0 ( de momento ) ya que en en breve quiero implementar un par de cosas más, y entre ellas estrá la capacidad de poder sumar una señal MIDI externa ( MIDI Merge ) y tendré que utilizar el que me queda como entrada serie.
The controller is based on an Arduino UNO copmpletamente, using all entries but the pin number 0 (for now) and that soon I want to implement a few more things, including stress and the ability to add external MIDI signal ( MIDI Merge) and I have to use the one I have as input series.
El controlador solo maneja CC ( Control Change ), el motivo por el cual elegí esta particularidad antes de abordar temás como el Program Change o el Play / Stop es que pueden emplearse para modificar cualquier parámetro y para mi E-MU 5000 me vá de perlas, así que si el sintetizador que queremos gobernar permite manejar CC, no habrá problemas para comunicarse con él.
The controller only handles CC (Control Change), the reason why I chose this feature before boarding issues as Program Change or the Play / Stop is that they can be used to modify any parameter of my E-MU 5000, so if the synthesizer you want to handle CC rule, there will be no problem communicating with it.
Por otra parte al no ser una de las partes estandarizadas en el protocolo MIDI, copié uno a uno los 127 parámetros que reconocía mi AKAI MPC 1000 con su sistema operativo actualizado al JJOS2XL http://www7a.biglobe.ne.jp/~mpc1000/os2xl/ así que haciendo esto me aseguraba que los parámetros que copiaba por lo menos estaban "actualizados" como mi AKAI.
On the other hand not being a party in the MIDI standard, I copied one by one the 127 parameters that recognized my AKAI MPC 1000 with its updated operating system to JJOS2XL http://www7a.biglobe.ne.jp/ ~ MPC1000 / os2xl / so doing that I made sure that the parameters were copied at least "updated" as my AKAI.
El material que he empleado ha sido este:
The material I have used has been this:
GLCD display 128X64 link
Podéis observar que este montaje no corresponde a la placa del Arduino UNO, pero para haceros rápidamente una idea de como va el conexionado creo que ya sirve.
You can see that this show is not for the Arduino UNO board, but to make you a quick idea of how the wiring goes I think it serves.
Por cierto el programa que hace estos graficos tan chulos se llama Fritzing y es Open Software.
Certainly the graphics program that makes these so cool is called Fritzing and Open Software.
Una de las pruebas con el display de 128x6.
One of the early tests with the display 128x64.
- Libreria MIDI aquí: link
- MIDI Library
- Potenciometros valor de 10K lineales, se encuentran en cualquier tienda electronica.
- Linear Potentiometers 10K value, found in any electronics store.
- Módulo MIDI: Lo hice siguiendo este esquema: link
- MIDI Module: I did following this scheme
- Módulo encoder: A partir de un dibujo que encontré, ya que al inicio estaba completamente perdido, no puedo poner el enlace porque no lo tengo, mil gracias al creador del boceto me fue de perlas.
- Encoder module: From a drawing I found, since at the beginning was completely lost, I can not put the link because I have not, thank the creator of the sketch.
Es un divisor de tensión un poco particular con un par de condensadores para evitar rebotes.
Is a curious voltage divider with a pair of capacitors to avoid rebounds.
Debo señalar que controlarlo por soft junto con el pulsador fue un infierno. Ya que al montarlo en la protoboard y con el juego que a veces tienen los cables me daban falsas señales y me pasé días en busca de la falla.
I should note that for soft control with the push was hell. Since when mounted on the breadboard and the game that sometimes have the cables gave me false signs and I spent days looking for the fault.
Aquí os adjunto un vídeo ( calidad teléfono móvil ) del funcionamiento de la primera versión del controlador conectado a la MPC 1000.
Here I attached a video (mobile phone quality) performance of the first version of MPC 1000 connected to the controller.
Sugerencias:
Suggestions:
C/C++ Curso de programacion Fco Javier ceballos Sierra
A mi me ha servido y me sigue sirviendo de mucho este libro, encuentro que es una joya, y su autor es espectacular el como explica las cosas.
C / C + + programming course ceballos Fco Javier Sierra
To me has served and continues to serve me this book a lot, I find it a gem, and its author is spectacular explains things.
Arduino Internals
Muy interesante.
Very interesting.
Programming And Customizing The AVR Microcontroller
Super interesante una vez te ha picado el mundo de los microcontroladores.
Super interesting once you've been bitten by the world of microcontrollers.
Nos vemos en la siguiente entrega.
See you in the next installment.


Hola!
ResponderEliminarUn amigo me mandado link a ru estupendo trabajo y leyendo he visto que quizas te pueda hacer una pequeña aportacion...
Sobre el esquema para el encoder podrias usar (no estoy seguro si es open la licencia pero diria que si mientras referencies...) los esquemas de piguiXXX
http://www.pighixxx.com/abc-arduino-basic-connections/
Hola Mutis Mayfield.
ResponderEliminarTe agradezco la molestía de escribir y el comentario, lo que pasa es que no acabo de ver en el esquema que me comentas la manera que tiene el chico de alimentar el encoder.
Aun y así muchas gracias.
Salud.
Hola!
ResponderEliminarDeclara las inputs como pull ups, mirate los detalles aqui...
http://www.pighixxx.com/questions/question/connect-an-encoder
Gracias de nuevo, sinceramente no tenía ni idea de que se pudiese hacer eso con las entradas del Arduino.
ResponderEliminarAhora si que en cuanto tenga un poquito de tiempo lo pruebo.
Por cierto conoces a quien escribe en ese blog? Los dibujos que muestra son muy chulos y quedan muy bien.
Una vez más, gracias.
(:
No se merecen... mi pequeña contribución a tu gran trabajo!
EliminarAlberto Piganti (PighiXXX) es un crack que entre otras cosas se dedica a diseñar esos dibujos para divulgación. Recientemente los ha recopilado en un librito portable a modo de manual de usuario llamado "ABC. Arduino Basic Connections" que es de donde he sacado el enlace que te he pasado.
Te recomiendo la web completa así como el librito. Por los 25 $ que me costaron son un regalo (tardío) de Reyes ideal!
Si puedo hacer algo más por ti, avisa!
-m!
Muchas gracias.
EliminarSi quieres que estemos en contacto, encantado.